Cat-proofing my garden
I have tried so many ways to cat-proof my garden that sometimes I felt as if I was going insane - one thing after another - they seem to work, then they fail. I have talked to people who have spent thousands installing rollers or other solutions, and none really works because an intelligent cat will find a way out. So I’ve been trying for years to find something that works and doesn’t cost the earth! I had one company quote £3000 for just one side of my garden, and for a solution that I know intelligent cats can get over. I have put up wire overhangs, higher, bigger, stronger fences… nothing worked, until now…. This system has been fantastic. I have to keep it maintained, and watch out for Claw (the determined one) who pushes and pushes at this, and eventually does force a hole. However, each time I fix it we’re OK for a few weeks, and I’m just adding more layers of netting where he pushes most, and each time it takes longer for him to find another way out, so that I know soon I will win - and I won’t have spent the earth to do it!This was written mostly by the friend who helped me: we’re both ‘girls’, so you don’t need to be a big beefy man to do this, you just have to be reasonably handy with simple power tools (electric drill with screwdriver head and staple gun).
This is to explain how we constructed the cat-proof fence around my garden, which is a large suburban garden. I have 6-foot-high close-boarding fence down the two sides, and heavy-duty welded mesh fence at the end, also about 6ft high, stapled to posts.
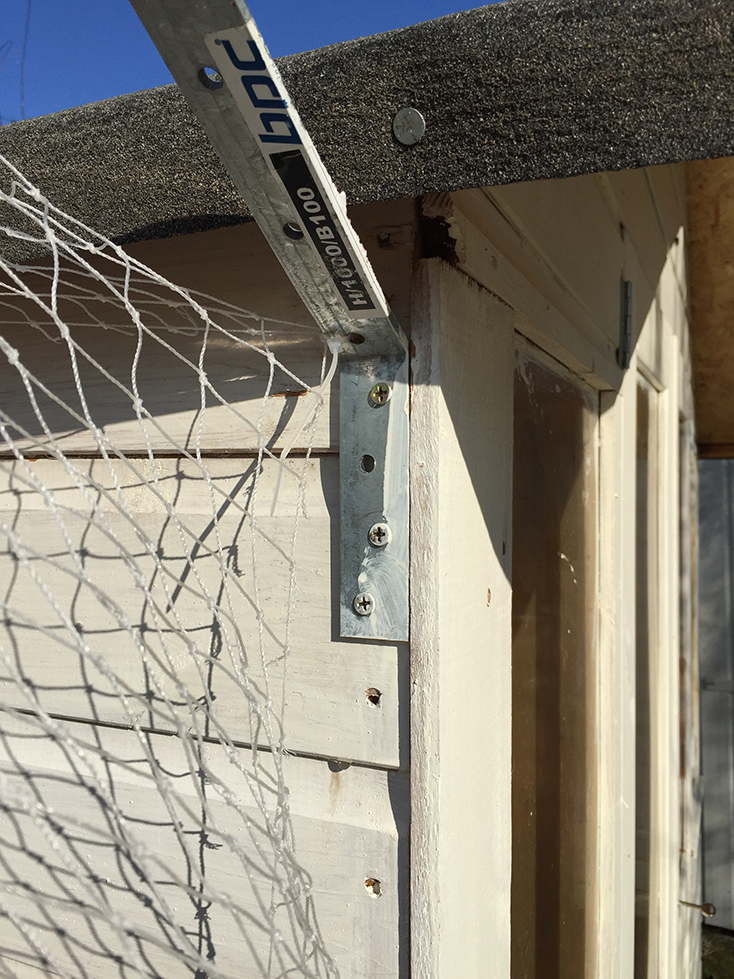
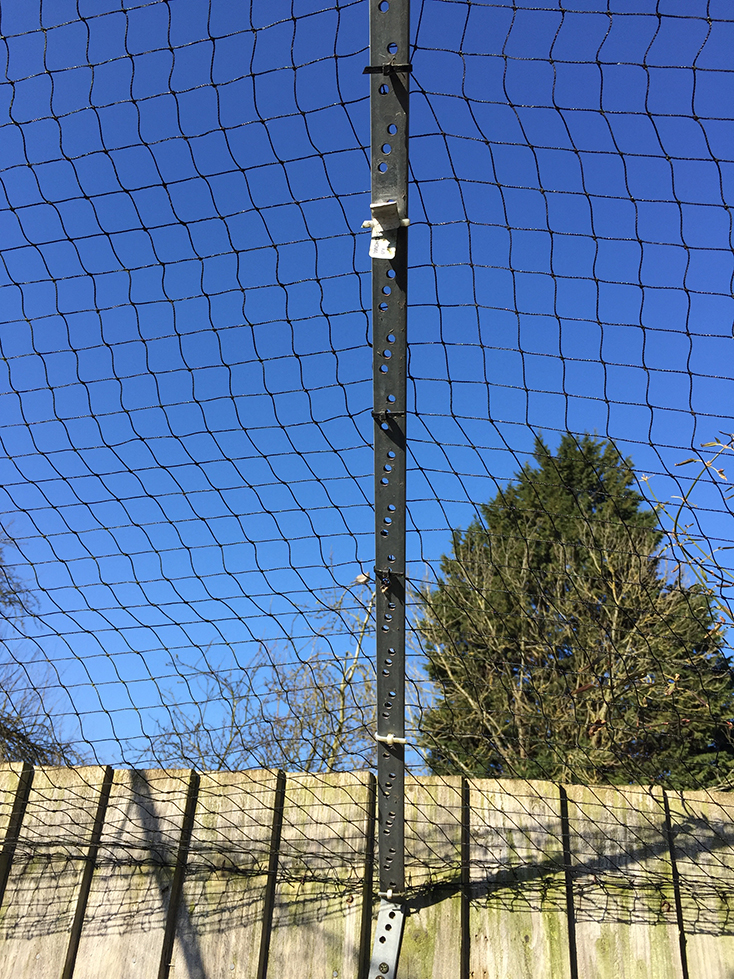
We bought restraint straps from Wickes (used for holding roofs onto houses, or beams onto each other), which are about 1.2 m long and made of heavy galvanised steel (about 4,85 each). They have holes pre-drilled along the entire length of the strap, are bent at 90 degrees at the end and extend another six inches or so beyond the bend. We needed to bend them further to an obtuse angle of about 135 degrees. We did this by sticking the short end of the strap between some patio stones putting a foot on the strap near the angle and leaning our entire body weight on the long end of the strap. Amazingly easy. We then screwed the short end of the strap onto the fence with the long end pointing up. Usually about three screws through the short part of the strap did the trick. We screwed them into the fence about 4 to 5 metres apart, as close to the top of the fence as we could get. Because we bought special (cheap) self-tapping wood screws, we didn’t even have to pre-drill the holes. You would have to pre-drill if you’re doing this along a wall.
We then took bundles of 1m x 20m bird netting and tied it with cable ties (zip ties) to the restraint strap and stretched it length-wise between the straps. As one of us zip-tied the netting to the next strap along the fence, the other used an electric staple gun to fasten the bottom of the netting to the wooden fence. Where there was no wooden fence (along the rear end of the garden), we secured the netting to the stiff wire fence with (lots) more zip ties. In all we used about 500, which sounds a lot, but they came cheapest in bags of 250, and we wanted to make sure there were no gaps large enough for a cat’s head!
I also have a big run next to the house, and wire is far too easy to climb, so we also put netting around the top of this, securing the bottom edge to the wire with the cable ties. Finally, I have one big shed close to one fence: I wasn’t prepared to take it down, so we also put brackets and wire all around that shed. Sounds nuts, but if you’ve had enough of your cats putting themselves in danger, you’ll do anything!
The tricky bit was the corners of the garden. We tried a few different methods - and I can't say we have a definitive solution for it... yet. One solution was to take the metal strap bent at 135 degrees and place it between the patio tiles again and twist the metal so that, when screwed to the fence, it stuck out at a 45 degree angle from the fence (rather than perpendicular to the fence). We then screwed the strap as close to the corner as we could get, and gathered the netting around the corner. We also tried using two straps that had not been twisted and spaced them so that when one of the straps was screwed onto one side of the fence, the second strap was screwed to the next bit of fence (at 90 degrees to the first bit) so that the tips of each strap were touching (that was for an internal corner). We then stretched and gathered the netting around these two brackets. It is rather hard to describe. I'm afraid we weren’t anticipating having to describe exactly how we did the corners, but maybe you can catch a glimpse of one of them somewhere in the pictures…
The last step is to cut off the ends of the zip ties. You might also want to paint the straps black with metal paint before screwing them to the fence. We found that the black netting was barely noticeable once we put it up. The silver colour of the straps isn't all that noticeable, but I imagine they'd be less so if they were painted black. Esther worried that the finished product would make it feel like were were trapped inside Alcatraz, but it's really very discreet. One mistake I made was to buy 'translucent' netting for a later mend, and this was actually white, and is very visible. Go for the black.
Marmite, who can clear a 6ft fence at a standing jump has been completely contained by this solution. The netting is too flimsy for them to get a good enough grip to climb. They don't like the feeling of having something under their feet that is unstable. The high angle and length of the brackets means it is too high to jump over unless they have something to launch from, like a garden chair or table, so be careful where you put your outdoor furniture.
Below are links to the materials we used. All were extremely helpful in getting what we wanted if they didn’t have enough in stock. I think in total, the entire fence (probably about 120 or 130 m) cost in the range of £250 to £300, which is certainly a lot cheaper than a professionally installed thing! The whole job took 2 long afternoons, and we’re pretty pleased with ourselves.
Some while after I put this up a company set up following my basic template to do this as a business. They have refined my bits and pieces and my techniques a lot, so their result has a very professional finish. I'm happy to recommend them if you can't face doing this yourself: https://protectapet.com/
Restraint Straps: http://www.wickes.co.uk/invt/246009 make sure you get good solid ones. I found quite a few flimsy ones when I went looking for a second batch, but they’re no good: you really need good solid ones that will hold their shape well even after being bent to 45 degrees. In the end I bought some heavy-duty ones from Amazon.
Bird netting: http://www.patrickpinker.com/?id=57&pid=844&area=5 since I put my netting up Pinker doesn’t seem to do it any more in 1m wide rolls. I bought some ‘opaque’ netting that turned out to be white, and was *extremely* visible compared to the black, which is almost impossible to see even on a bright sunny day.
Cable ties: http://www.wickes.co.uk/invt/711855 or extremely cheap from Amazon.
One inch wood screws: http://www.wickes.co.uk/invt/511080 (something like this, anyway - I think ours were a bit more stout)
If all this seems like too much hard work, then I can highly recommend PROTECTAPET. Lovely people, superb product (installed or DIY), and based on my solution, but with custom designed components and considerable expansion and refinement. Their website will give you lots of good ideas.